Migration Assistant is a useful tool for transferring data from an old Mac or Windows PC to a new Mac. It can migrate documents, applications, user accounts, and settings without requiring you to manually copy files. However, some Mac users report that after using Migration Assistant, they can’t find their data on the new Mac, despite the process indicating that it was successful. It's important to note that Migration Assistant doesn’t alter the data on the old Mac, but certain actions like resets or formatting may inadvertently erase data. If you find yourself in this situation, don’t panic! In this article, we will guide you through the steps to recover your lost data after using Migration Assistant on your Mac.
Recover Data from Time Machine Backup
If you backed up your old Mac with Time Machine before running Migration Assistant, you can easily restore your data from the backup.
1. Connect the external hard drive containing your Time Machine backup to your new Mac.
2. Click the Time Machine icon in the menu bar and select Enter Time Machine.

3. Navigate to the date of the Time Machine backup that you need. Find and select the backup of your Mac data. Right-click and choose Restore or Copy from the context menu to complete the recovery process.
Recover Data Using Fireebok Data Recovery App
If you didn’t back up your old Mac with Time Machine, you can recover lost data using Fireebok Data Recovery. This app can recover deleted or lost data from your Mac's startup disk or any external hard drive.
1. Download and install Fireebok Data Recovery on your old Mac.
2. Launch the app and select your Mac’s startup disk (usually labeled "Macintosh HD"). If you need to recover data from another volume, select that volume instead.
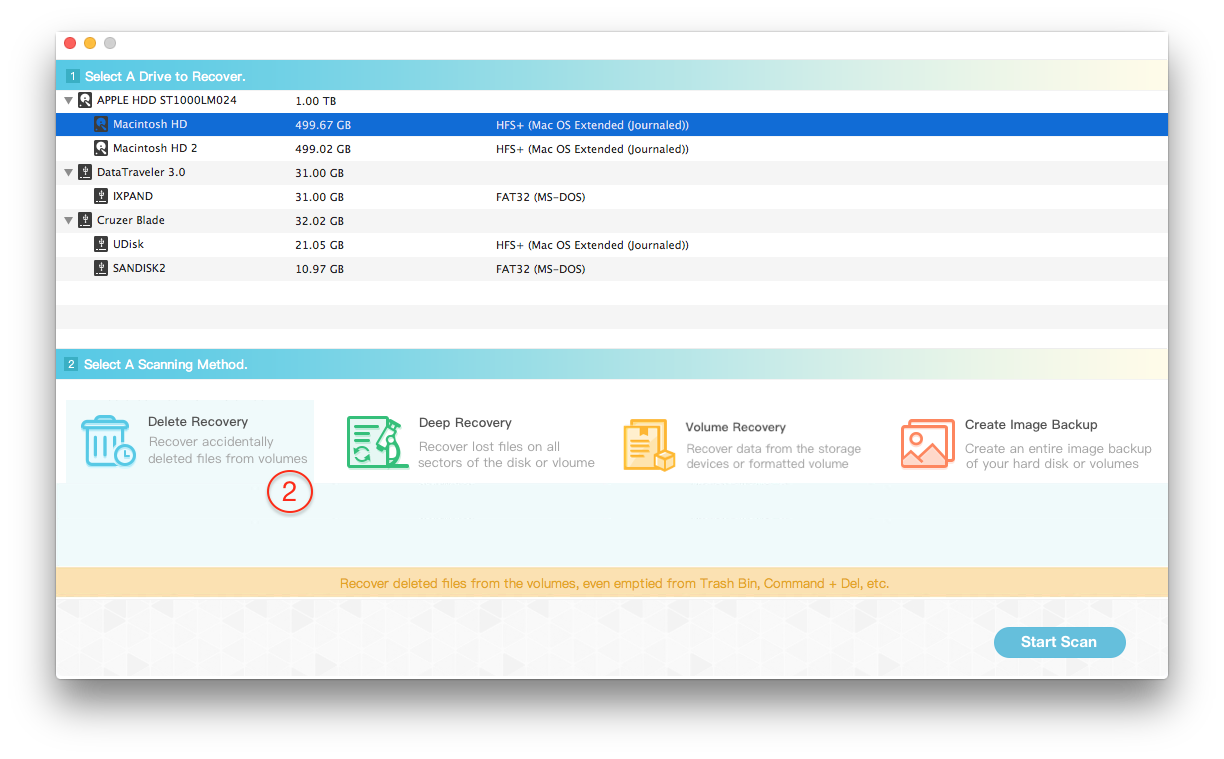
3. Choose Deleted Recovery and click Start Scan. Wait for the scan to complete, then preview the results.

4. Select the files you want to recover, and save them to a different disk or USB device to avoid overwriting the original data. If you can’t find your lost data using Deleted Recovery, switch to Deep Recovery mode. This will extend the search area and may help you find additional files.

About Fireebok Studio
Our article content is to provide solutions to solve the technical issue when we are using iPhone, macOS, WhatsApp and more. If you are interested in the content, you can subscribe to us. And We also develop some high quality applications to provide fully integrated solutions to handle more complex problems. They are free trials and you can access download center to download them at any time.
| Popular Articles & Tips You May Like | ||||
 |
 |
 |
||
| Five ways to recover lost iPhone data | How to reduce WhatsApp storage on iPhone | How to Clean up Your iOS and Boost Your Device's Performance | ||