iCloud is providing a terrific way for storing and sharing your favorite moments with friends and family by photo stream. As known, iCloud only offers 5GB of free storage, so how to achieve saving more photos in Photo Stream. According to this question, here is to clarify: Photo Stream doesn’t count iCloud storage, but all the photos can only be saved on iCloud server for 30 days. Thus, how to use iCloud Photo Stream properly? How to manage and get the photos from iCloud? Is it available to reach on a Mac?
For these issues, we’ll illustrate 2 solutions for different situations:
Get Photos from iCloud Online with Photo Stream
With Photo Stream and your iCloud ID, you can easily access your photos online. Once you turn on My Photo Stream and sign in to iCloud account, all the photos taken on your iPhone or iPad will be automatically synchronized. Plus, you can see the pictures that others shared with you, just enable the iCloud Photo Sharing button. You can easily manage them in 30 days. Just see the following guide:
1. View pictures from iCloud on iOS device
Step 1: Open "Settings" from the home screen of an iPad, or iPhone and tap "iCloud." And enter your Apple ID as prompted.
Step 2: Launch the "Photos" app and tap the "My Photo Stream" button and “iCloud Photo Sharing” button. For iOS 8 and later users, you can turn on “iCloud Drive”.
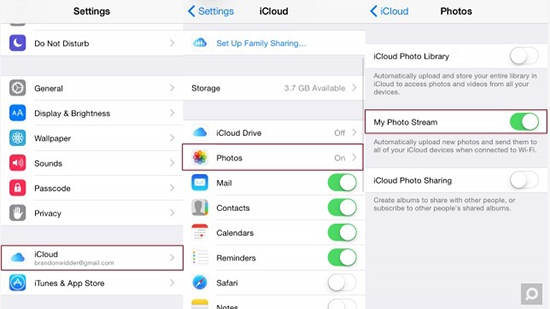
Step 3: See pictures you uploaded yourself. If someone has shared a Photo Stream album with you, it will be available on this screen as well.
2. Get photos from iCloud on Mac computer
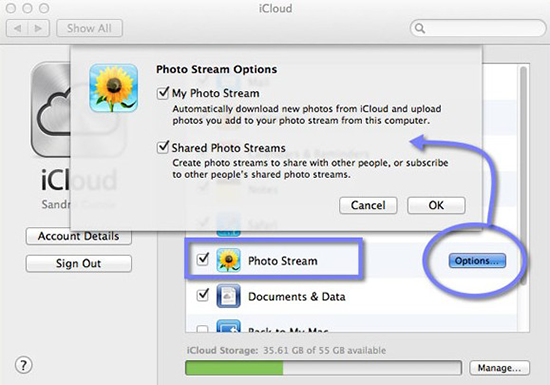
Step 1: Select "System Preferences" from the Apple menu on your Mac desktop and click "iCloud." Click the "Photo Stream" check box and then click "Options" to ensure that both "My Photo Stream" and "Shared Photo Streams" are enabled.
Step 2: Launch either iPhoto or Aperture. Click the "iPhoto" or "Aperture" menu at the top of the screen and select "Preferences." Click the "Photo Stream" tab and then select the "My Photo Stream" and "Shared Photo Streams" options.
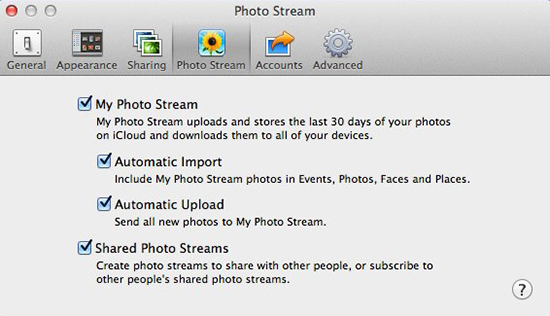
Step 3: Select "Photo Stream" from the main window in either iPhoto or Aperture after you have configured it to see your Photo Stream photos.
Note: You can use iCloud Drive to see the pictures from iCloud on Mac. But it requires Mac OS X 10.10/Yosemite. Drag and drop files into your iCloud folder to upload them to your iCloud storage. After that you can access them on any devices, iPhone, iPad, iPod.
Access Photos from iCloud with iCloud Extractor
iCloud Extractor is indeed the most convenient way to get your pictures from iCloud backup. With this tool, you can easily scan and download all the photos previously stored in iCloud backup, no need to connect with your device.
First download this tool on your Mac computer. And then install and run it immediately.
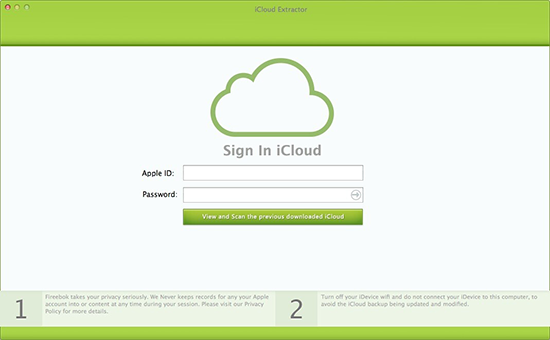
Step 1: Sign in to iCloud account. Click the “View and Scan the previous downloaded iCloud” button. iCloud Extractor will automatically scan your iCloud backups.
Step 2: All the scanned iCloud backups will be listed, choose the backup file to get downloaded.
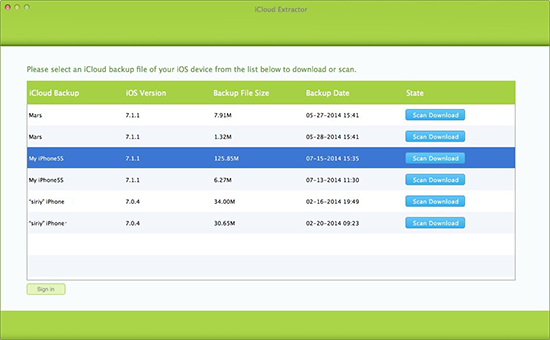
Step 3: Check the “Photo & Videos” and access photos from iCloud Backup on Mac. You are allowed to select whatever you want to save on your Mac.

Either method to choose, you can successfully access your pictures from iCloud on Mac. Moreover, for iCloud Extractor, you can also access iCloud backup contacts, video, message, notes, call history, etc. With it, you can choose to remove and delete iCloud backup to make room for iCloud storage.
About Fireebok Studio
Our article content is to provide solutions to solve the technical issue when we are using iPhone, macOS, WhatsApp and more. If you are interested in the content, you can subscribe to us. And We also develop some high quality applications to provide fully integrated solutions to handle more complex problems. They are free trials and you can access download center to download them at any time.
You May Also Like
How to Clean up Your iOS and Boost Your Device's Performance
How to Extract WhatsApp Messages from Your iCloud Backup
How to Recover Deleted Text Messages from Your iPhone

