There have always been issues with Wi-Fi disconnection on iOS 9.3. This has been one of the major annoying part of the iOS in many iPhone devices that user has been going through without solution. Apple has tried tirelessly to fix this problem but users keep on having the same issues on many times.
The issue with iOS and Wifi are been experience almost every day by users. While some said their device is not connecting to the internet, some said their own W-Fi disconnects at very annoying time. Whatever the issue is, this article will tell you how to fix the stubborn Wi-Fi problem.

Steps to Fix Wi-Fi Issues in iOS 9.3.2 on iPhone
You will have to reboot your iOS device. After rebooting your iPhone device, you will then try to connect again to the WiFi network.
In case you don’t know how to reboot your iPhone 6 and 6 Plus. You will hold on the sleep/wake button simultaneously for about 10-15 seconds until Apple logo appear on the screen of your device. Then reboot your router, your modem as well as your device. Disconnect your iPhone from the wifi network and try to connect again.
Steps:
• Step 1. Click on Settings and then click on Wi-Fi. From there go to Wi-Fi Settings on your iPhone in iOS 9
• Step two 2: Click on the name of the network you wanted to connect to.
• Step three 3: Click on forget This Network.
You may need to toggle Wi-Fi Assist; it is an all-new feature that is part of iOS 9. It enables your iPhone to connect to the mobile data whenever there is poor WiFi network. Make use of it by trying to toggle it on/off a few times. These are the steps to follow;
• Step 1. Click on Settings and then Mobile Data.
• Step two 2: Scroll down to the bottom and toggle On/Off Wi-Fi Assist.
You can also try Open DNS or Google DNS
Changing the DNS server to OpenDNS or Google DNS may help you to resolve the speed or connectivity issue
The steps:
• Step 1. Click on the Settings then click on Wi-Fi.
• Step two 2: Click on the Name of the network and you can see details like IP Address, Subnet Mask, Router, and DNS.
• Step three 3: Click on the numbers next to the DNS. You will then type the Google DNS if you are using Google DNS. You will type Google DNS in primary DNS or secondary DNS separated by a comma (8.8.8.8, 8.8.4.4). You can also use the option of Open DNS and the number to input are (208.67.222.123, 208.67.220.123).

How to use Google DNS for Wi-Fi on iPhone
• Step 1. Click on Settings and then Privacy.
• Step two 2: Click on Location Services and then System Services.
• Step three 3: Toggle off Wi-Fi Networking.
To reset Network Settings
Resetting the network settings can help you fix the problem right away.
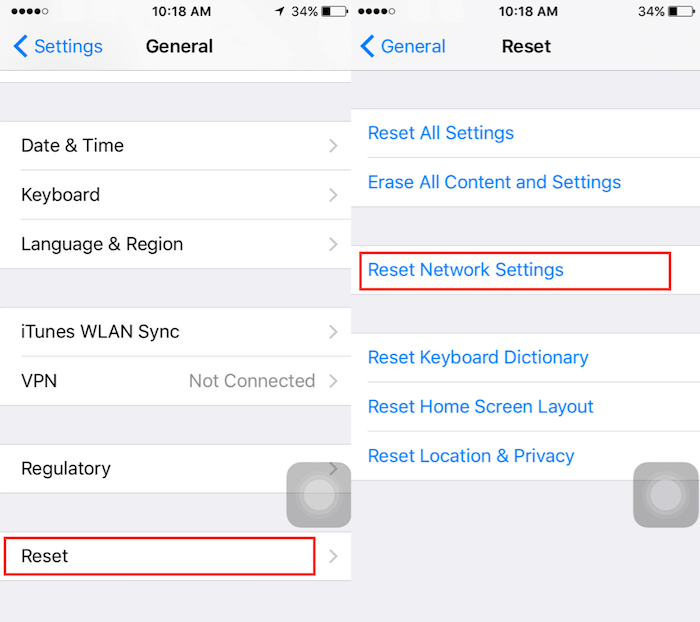
• Step 1. Launch Settings and then click on General.
• Step two 2: Scroll down and tap on Reset and click on Reset Network Settings and confirm it.

If all effort has been exhausted and yet no solution, you may need to restore your device to Factory Settings. Before restoring to Factory setting, make sure you back up your information before proceeding to factory restore.
Steps:
• Step 1. Connect your iPhone to Computer.
• Step two 2: Launch iTunes and select your device.
• Step three 3: Next up, clicks restore iPhone in the summary panel.
• Step three 4: Click Restore again to confirm. It will erase your device and install the latest iOS version.

- Clean MyPhone
Transfer iPhone all data, save disk space, organize the files and enhance the performance of your iPhone,
iPad or iPod touch.
For Windows & Mac OS X
About Fireebok Studio
Our article content is to provide solutions to solve the technical issue when we are using iPhone, macOS, WhatsApp and more. If you are interested in the content, you can subscribe to us. And We also develop some high quality applications to provide fully integrated solutions to handle more complex problems. They are free trials and you can access download center to download them at any time.


