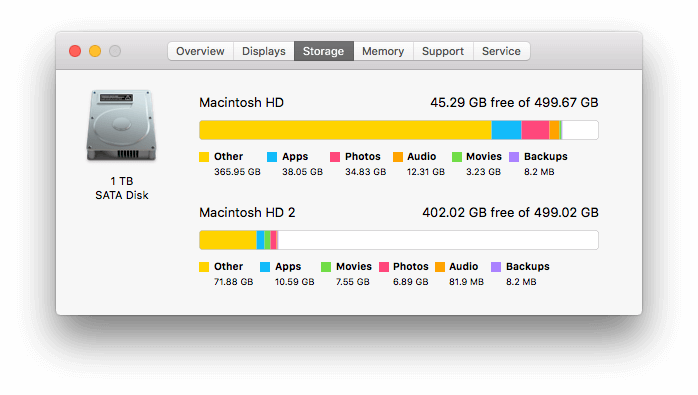
After I update my computer to the macOS High Sierra, I find the system storage takes up the huge disk space. It shows system storage is nearly 550GB in my 1TB iMac. What's the reason of the issue? How to fix it?

And I check my another iMac computer with macOS 10.11.6 version. It shows that there are about 365GB "Other" data in the 500gGB system volume. On the Mac computer, the file system defines some categories: Apps, Movies, Photos, Audios and Backups before the High Sierra. Anything stored on your computer that cannot fit into one of those 5 categories is categorized as "Other." And it seems that the system storage contains the "other" data in macOS High Sierra.

"Backups" refers to Time Machine Snapshots that are made when the Time Machine backup drive is not available. When the backup drive is finally reconnected, Time Machine is supposed to transfer the snapshots to the Time Machine backup drive then erase the ones on your hard drive. "Apps" only include those found in your Applications folder. Thus, "Other" consists of some of the same types of files found on your Device:
1. Browser cache, cookie and other data
2. Mail cache, messages and attachments
3. The third party App cache and junk files
4. Trash data
5. iOS sync Appliations
6. iOS Photo cache
7. System and user log files
8. Downloaded files
9. Preference files
10. iOS backups
And more
So you need delete some big "Other" data to free up the system storage on the computer. Here are some tips to remove the "Other" data.
1. Check Time Machine local backups
Time Machine in macOS High Sierra stores snapshots on every APFS-formatted, all-flash storage device in your Mac or directly connected to your Mac. Local snapshots help Time Machine restore data even when your Time Machine backup disk isn't available. Sometimes Time Machine local backups were the reason, they will take up most of the system "Other" storage. Here are the steps to complete it.
1. Open Terminal.app (within /Applications/Utilities)
2. su root (the current user "theUser" has normal rights and "root" has root/admin rights)
3. sudo su
4. tmutil listlocalsnapshots
5. tmutil deletelocalsnapshots 2017-09-27-005259
2. Check the Large Files
If the system storage is still huge after delete the locals snapshots, you need check the large files in some place. Different computer has different usage environment, we don't know where they are. But we can user the some third party app to use the Mac PowerSuite to scan the whole disk to find the large files. PowerSuite can not only delete application cache, system log, browser data, but also find the large files, find duplicate files, uninstall app and secure deletion.
First download Fireebok PowerSuite to your computer
Step 1: Launch powerSuite, and you’ll see four modules on the main window: Clean Up, Find Duplicate Files, App Uninstaller and Eraser.

Step 2: The Clean Up module is designed to remove junk files including Caches, Trashes, Web Data, iService & Large Files, Mac PowerSuite will scan your Mac for junk files automatically every time you launch the program, and show you which types of data occupy the disk space.

Step 3: Click Large Files functions, it will pop-up the window with all large files. Just choose some that you need to remove.
Step 4: Click the  button to remove all or partial selected files. It is noteworthy that the some data like Web Form Values and iMessage Attachments may be useful to you.
3. Check the Duplicate Files
Thirdly, locate any duplicate files on your hard drive and delete them will free up your computer storage too.
1. Simply add the file or folder to scan for duplicate files via Drag-Drop, then click the Quick Scan button;

2. After the scan is finished, Mac PowerSuite will show you all duplicates in the window. Its built-in tool allows you to preview the photos, and Auto Check will keep the original file in a set of duplicates meanwhile discards the others.

3. Select which duplicates or use Auto Check to remove by clicking  ;
;

About Fireebok Studio
Our article content is to provide solutions to solve the technical issue when we are using iPhone, macOS, WhatsApp and more. If you are interested in the content, you can subscribe to us. And We also develop some high quality applications to provide fully integrated solutions to handle more complex problems. They are free trials and you can access download center to download them at any time.


